Showing posts with label recipe. Show all posts

Saturday, 12 April 2014

Banana Macadamia Pancakes with Orange Butter

No matter how long the winter, spring is sure to follow. - Proverb


My littlest son, 8 yrs old, expecting pancakes, ran down the stairs bright and early to see which flavour was being made today.  "Banana, "I said.  "Yuck!" he said, "I hate banana pancakes."
Honestly, me too, I am not a fan of banana pancakes...but something about this recipe caught my eye...and I am very happy it did. These were a very big hit.  My eldest son and my husband declared these their new favourite pancakes.  They loved the addition of the macadamia nuts. And my littlest complainer, even ended up saying, "Yum! I love these! Can I have some more of the orange butter on top!"

For this beautiful spring day...I give you...

Banana Macadamia Pancakes with Orange Butter (from epicurious.com )
makes 15 4-inch pancakes

Ingredients
for the pancakes
1 1/2 cups flour
3 Tablespoons sugar
1 1/2 teaspoons baking powder
1/2 teaspoon baking soda
1/4 teaspoon salt
1 1/2 cup buttermilk
3 Tablespoons unsalted, butter melted
2 large eggs
1 teaspoon vanilla
2 ripe bananas
1/2 cup roasted macadamia nuts, chopped

for the orange butter
1/2 stick (1/4 cup) unsalted butter, softened
1/2 teaspoon grated fresh orange zest
1/2 teaspoon fresh orange juice
1/8 teaspoon salt

Directions
for the pancakes

1. Whisk together flour, sugar, baking powder, baking soda, and salt in a bowl.
2. In a separate bowl, whisk together buttermilk, 2 tablespoons melted butter, eggs, and vanilla until smooth.
3.Add flour mixture and whisk until just combined.
4. Mash banana and fold into batter along with nuts. (Batter will be very thick.)
5. Cook on a buttered (lightly oiled) skillet or flat top over medium heat.,using about 1/4 cup of batter for each pancake.

for the orange butter
1. Stir together all orange butter ingredients in a small bowl until combined well.
2. Once combined, add to the top of warm pancakes and serve with maple syrup.

Enjoy! Happy Spring!

Saturday, 8 February 2014

Sweet Potato Muffins

 What I say is, if a man really likes potatoes, he must be a pretty decent sort of fellow. - A.A.Milne


When I was growing up, I only remember sweet potatoes at Thanksgiving, with marshmallows melted on top.  But, somehow I could never bring myself to eat this traditional food.  Something about melted marshmallows on vegetables never appealed to me...all I remember is my mom saying,"Just try it."  And me saying, "No, way!"

But the sweet potato is so versatile...It can do so much more than grace your holiday table adorned with marshmallows...Did you know that sweet potatoes are listed as one of the top super foods for health...containing important ingredients such as Vitamin A, Vitamin D, Vitamin B6, Vitamin C, Potassium and Magnesium (Sweet Potato Health Benefits Link)

I have made sweet potato muffins for years.  But this recipe, originally from Gwyneth Paltrow (with slight changes) has become my new favourite.  It is very moist and the flavour of the sweet potato shines through...  It is a perfect start to an icy, cold morning.  Even my little picky eaters quickly ate these up!  I hope you enjoy them, too!

Sweet Potato Muffins 
makes 12 muffins
Preheat oven to 400F

Ingredients
2 large sweet potatoes cooked, skinned and mashed
1/3 cup extra virgin olive oil
1 cup almond milk ( I used coconut milk)
1/3 cup honey
3 Tablespoons brown sugar
1 teaspoon vanilla extract
2 cups spelt flour
2 teaspoons baking powder
2 teaspoons baking soda
1 Tablespoon Chinese five-spice powder

Directions
1.  Whisk olive oil, almond milk, honey, brown sugar, vanilla into the mashed sweet potatoes.

 2. In a separate bowl, mix together flour, baking soda, five-spice powder, and salt.
 3.  Fold the dry ingredients into the wet ingredients.

4. Distribute the batter into a greased 12 cup muffin tin.

5. Bake at 400F for 20-25 minutes or until a toothpick comes out clean.  During the last five minutes, remove the muffins from the oven and brush the tops with maple syrup.

6. Enjoy!


 The end!

Tuesday, 7 January 2014

A Winter's Breakfast (or How to Survive a Deep Freeze)

A cold wind is blowing from the north, and it made the trees rustle like living things. - George R. R. Martin


As news of the dropping temperature is covering headlines...I wanted to share some of my favourite foods for a cold winter morning. My mom is convinced that if you eat according to the weather...you will not feel as cold.  (Yes, she is giving me this advice from sunny Florida).  But I will say, cold mornings start better for me when they begin with warm foods.
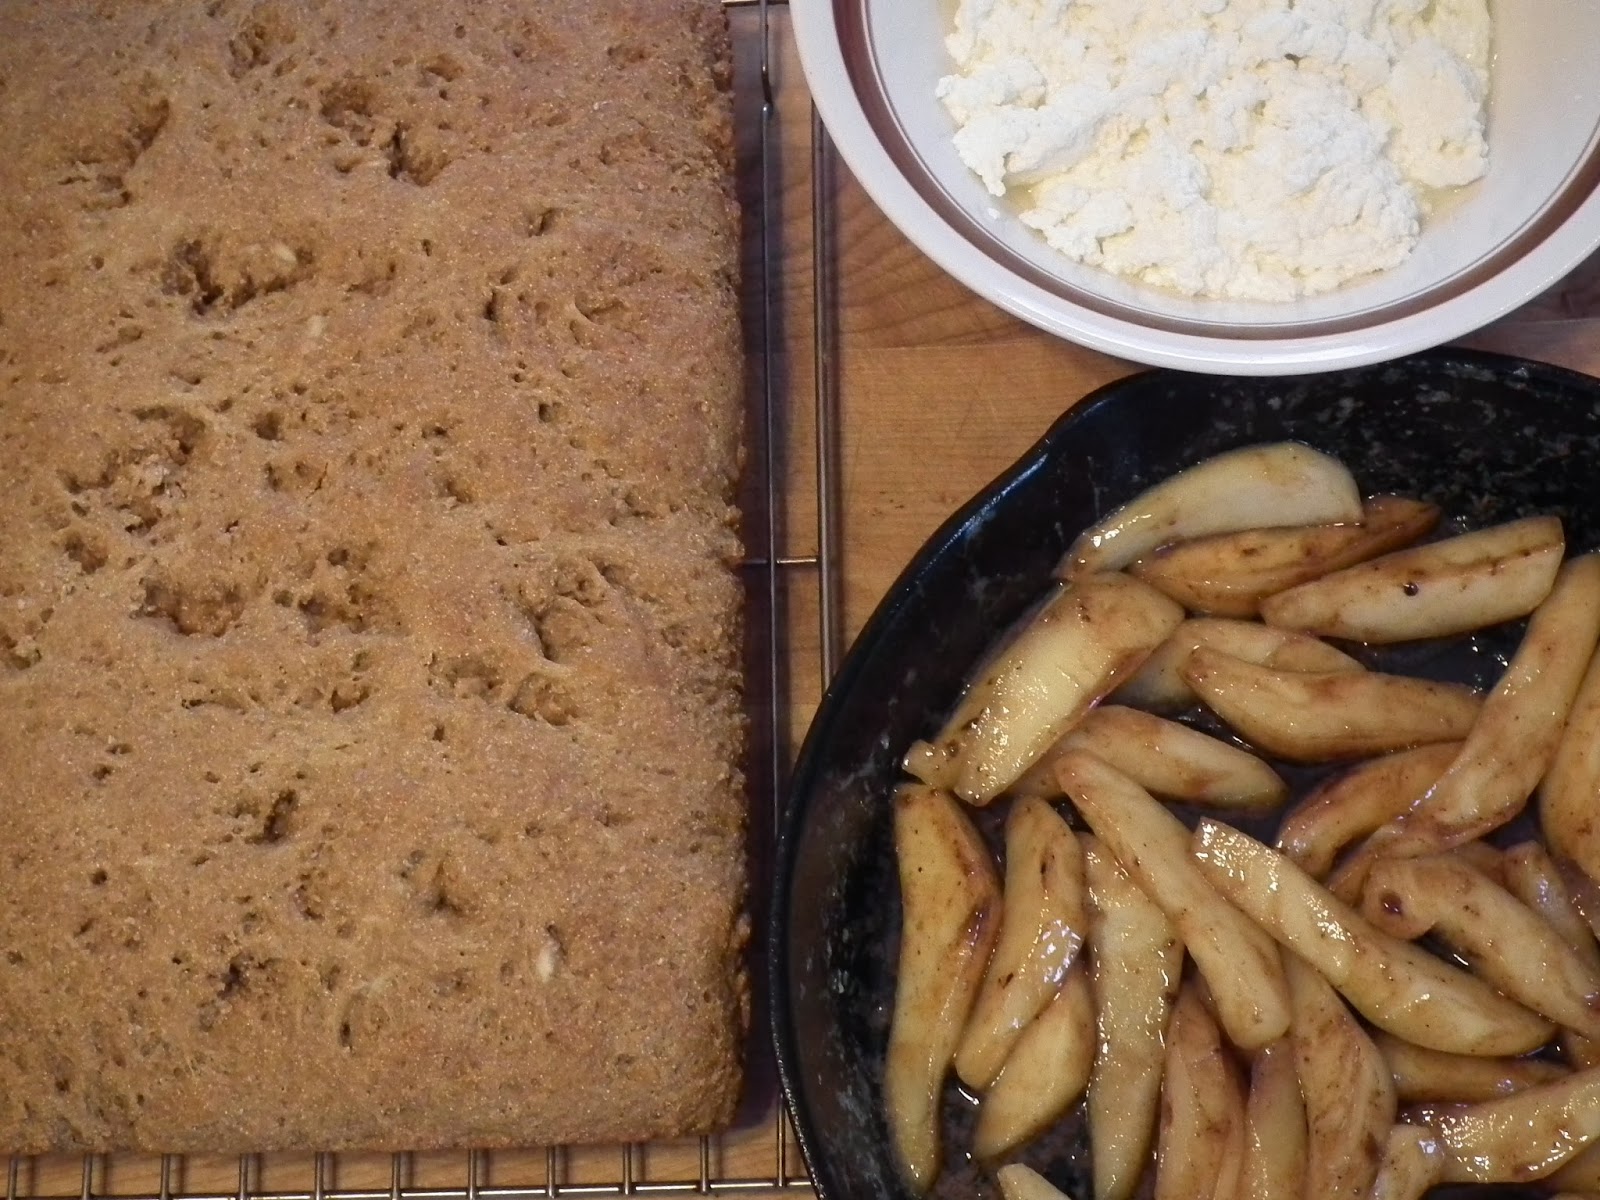
 The Quick Whole Wheat Molasses bread is a dense, filling, lightly sweetened bread that is nice served warm with butter. The addition of fresh warm homemade ricotta and fried pears will warm your soul...and my mom guarantees...you will soon be going out in sub zero temperatures saying,"Hey! This isn't too bad.". I hope you enjoy this breakfast as much as we did.

In three parts....

Quick Whole Wheat Molasses Bread (from NY Times )
Preheat oven to 325 degrees F
bake for 45-60 minutes
serves 6-8

Ingredients
1 2/3 cups plain yogurt
2 1/2 cups whole wheat flour
1/2 cup cornmeal
1 teaspoon salt
1 teaspoon baking soda
1/2 cup molasses

Directions
1. Mix all the dried ingredients in a bowl.

2. Mix all the wet ingredients together. 

3. Stir liquid into dry. Stir just until combined.

4. Bake in a greased 8x8 inch pan or a loaf pan at 325 for 45-60 minutes.  An inserted toothpick should come out clean.
5. Cool in pan on rack for 15 minutes before serving. Enjoy!

Fried Pears
cook on stove top : skillet
serves 6-8

Ingredients
 4 large pears
1/4 cup butter
1/4 cup brown sugar
1/4 cup cream or milk.

Directions
1. Remove peels and cut pears into wedge shapes.


2. Melt butter over medium heat. Add brown sugar. Then cream. While stirring, allow the mixture to cook for about a minute. 

3.  Add pears to the hot brown sugar mixture.  Continue to cook over medium low heat until the pears are a golden brown and tender. Serve Warm. Enjoy!


Homemade Ricotta Cheese
Stove top: Saucepan

Ingredients: (yields about 1-2 cups)
6 cups milk
2 cups cream
3 Tablespoons lemon juice (or vinegar)
1 teaspoon salt

Directions
1.  Heat milk, cream and salt in a saucepan over low heat until bubbles start to form. (be careful not to let the milk boil over the pot)
2.  Add lemon juice to bubbling milk.
3.  Continue to stir until curds start to form in the hot milk and the remaining liquid begins to turn more opaque.
4.  Remove from heat source.
5. Pour currdled milk into cheese cloth or a collindar lines with a light tea towel or as a did...a fine meshed collander works and there is less clean up.
6. Let the whey drain out.  
7. Serve warm.  Warm ricotta cheese tastes great topped with honey or maple syrup. 

Enjoy and stay warm!!


Wednesday, 23 October 2013

La Belle Province and Maple Pudding Cake

There are far, far better things ahead than any we leave behind. - C.S. Lewis


Old Quebec City photo by Tatjana Tadin
Last month my family and I, together with my visiting older brother,  had a chance to take a short trip to La Belle Province, the french speaking portion of Canada, also known as Quebec. From my home to the capital of the province, it took about six hours by car. My littlest one complained almost the entire way. He emphatically believed  that there was absolutely nothing worth such a drive.
Until we finally saw...the cannons.  Then, suddenly his world began to change...and life was not so bad after all.
My older brother with my four children
 Then there was  the "castle"...and the fortresses....
Hotel Frontenac
 Though the sites did inspired my little band of travellers, my eldest boys were most inspired by the new food experiences of the province.  The Quebecois have inherited a love of food from their French forefathers. One of our favourite recipes of the trip was baked by my friend, Pierrette, who gave us our first taste of  this French Canadian treat...

 
Maple Pudding Cake(Chomeur)recipe adapted from:Ben's Maple Syrup
preheat oven to 350 F

Ingredients 
3 cups all purpose flour
1 1/2 cups sugar
4 teaspoon baking powder
1 teaspoon salt
1 1/2 cups milk
1 cup chopped nuts ( I used pecans, but walnuts are good, too)
2 cups maple syrup
1 cup water
4 Tablespoons Butter
(optional: serve with sour cream or creme fraiche )

Directions
1.Mix together flour, sugar, baking powder, salt milk and nuts.

 2. Pour into a greased 9 X 13 pan.

3. Combine maple syrup, water, and butter into a small saucepan. Heat just until the butter melts.

  4. Pour the warm sauce over the cake batter. Do not stir.

5.  Bake for 45 minutes in preheated oven (350 F).

6. Cut and serve.  It is nicest warm. 


 Enjoy!

Friday, 4 October 2013

Pumpkin Bars

Listen! the wind is rising, and the air is wild with leaves. We have had our summer evenings. Now for October eves. - Humbert Wolf 
 

Recently,  I read a very wonderful book called, The Spark: A Mother's Story of Nurturing Genius, by Kristine Barnett.  It is an autobiography of a mother who was able to reach inside her young child with autism and help him succeed. It was a beautifully written story that showcased a mother's love for her child...and her desperation to reach him.  She pointed out that all children have unique gifts, that need to be nurtured in unique ways...
She mentions in her book numerous ways in which to help children(and adults) enjoy life...
One small point she included, was filling the air with sweet smells...from lavender scented playdough to fresh roasted chicken with herbs wafting from the oven.  I agree. So I hope to inspire you by giving you this fall recipe...pumpkin bars...and the beautiful scents that will fill your kitchen when these are baking...

Pumpkin Bars (adapted from Chocolate Covered Katie)
makes one 8 x 8 pan of pumpkin bars
preheat oven to 350 F

Ingredients:
For Pumpkin Bars:
1 cup spelt flour ( or any flour you would like)
2 teaspoon cinnamon
1 teaspoon baking powder
1/2 teaspoon baking soda
1/2 teaspoon salt
2 eggs 
1/2 cup brown sugar
1 cup pumpkin
4 Tablespoons milk
4 Tablespoons oil
1 teaspoon vanilla


Directions:
1. Combine all the dry ingredients in a bowl, except for the brown sugar.

2. Mix the brown sugar and all the wet ingredients in another medium size bowl.

 3. Then pour the wet ingredients into the dry ingredients.
4.  Next, Pour the mixture into a greased 8x8 baking pan and cook for 15-20 minutes.
5. Let cool on a wire rack.

Cream Cheese Icing (from Better Homes and Gardens)
Ingredients:
1/2 block of cream cheese (about 4 ounces)
1 cup icing sugar (or to taste...I used about half this amount)
1-2 Tablespoons milk
1 Teaspoon vanilla

Directions:
1.  Beat all the ingredients with an electric mixure till light and fluffy.

2. Frost pumpkin bars when cooled.

Enjoy!


The End!

Tuesday, 17 September 2013

Cheese Pita (Burek) and a Changing Landscape

Autumn, the year's last, loveliest smile. - William Cullen Bryant


The days of summer have passed and the landscape around my house has already dressed in it's new fall colours.  My littlest son has taken his snow board out of storage, and placed it at the foot of his bed...because he claims he smells winter in the air, our pear tree is brimming over with fresh fruit, we are picking fresh pumpkins from our garden and putting on our warm sweaters.
Of all the seasons, fall is one of my favourites... 
Somehow when the days begin to get cooler, I love to cook again.  And of course, warm comfort foods, hot from the oven, top my list
The first time I met my husband's family, Cheese Pita was served...and from that day, Cheese Pita remains one of my favourite Serbian dishes...and favourite comfort foods, too (I do think butter and salt are good for the soul...even if they are not so good for your heart).  Consequently, every time I was ever invited over, someone was sure to make it for me. Chuckling my husband's aunt would say, "Oh! it is so easy to make...anyone can make it." And for the longest time, I did not believe her.  But the truth is...Cheese Pita...or Burek (as it is officially called) is a very easy dish to make.  It is usually served as a side dish with a meal....but it is also sometimes served as the main dish.  In Fall, it makes a nice quick dinner served with a hot soup.
Here is my husband's Aunt's recipe for Serbian Burek....Cheese Pita....
I hope it becomes one of your favourites ...(even my little children love this one, too!)

Cheese Pita (or Burek)
makes one large 9x13 thick pie (or one large 11x15 thin pie)
preheat oven to 375 degrees Fahrenheit

Ingredients
1 large container of cottage cheese (750 grams)
1 package pressed unsalted cottage cheese (500 grams)*
8 eggs
1-2 teaspoons salt 
1 package phyllo pastry
1/4 - 1/2 cup of melted butter (for drizzling/brushing onto the phyllo pastry)


Directions
1.  Mix first four ingredients in a bowl.


2.  Lightly grease the bottom of a baking pan.  (I used a 11x15x2 pan...but a 9x13x2 pan could also be used...giving a thicker pie).
3.Carefully place on sheet of phyllo, fold if necessary, into the bottom of the pan. Drizzle with butter.
Repeat four more times....line with phyllo and then drizzling each new sheet with butter.  This will form the bottom of the pie...so it should not be too thin.


4. Next, gently spread an even layer of the cheese filling on top of the buttered phyllo sheets.


5. Gently cover the cheese layer with a sheet of phyllo pastry.  Drizzle with butter.  Then again, one more phyllo sheet and drizzle again with butter. (having a total of two-three sheets of phyllo on top of the cheese layer)


6.  Continue alternating between cheese filling and pastry layers until all the filling has been used. Then top off the pie with three consecutive layers of phyllo, all brushed with butter to make a thicker top.
7.  Score the top layers into the desired serving size pieces. (Crisp phyllo is hard to cut...this step just makes for nicer presentation)


8. Bake in a 375 degree Fahrenheit oven for about 45 minutes...or until the top is a golden brown.


9. Serve warm.  Enjoy!

*if you can not find pressed cottage cheese (which is usually found in the same area of the grocery store as regular cottage cheese....you can use feta cheese...but just be sure to decrease the amount of salt)


The End!